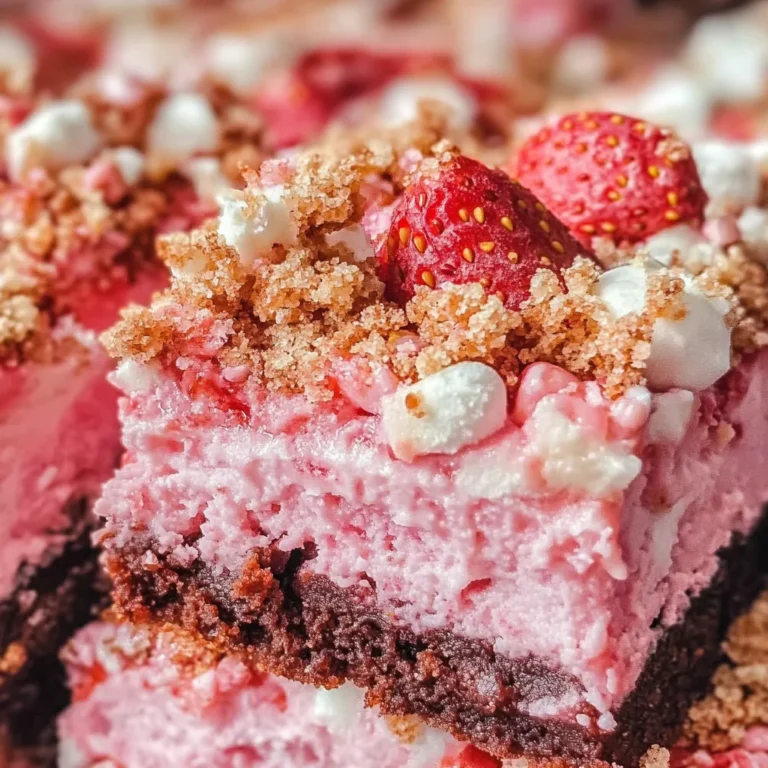
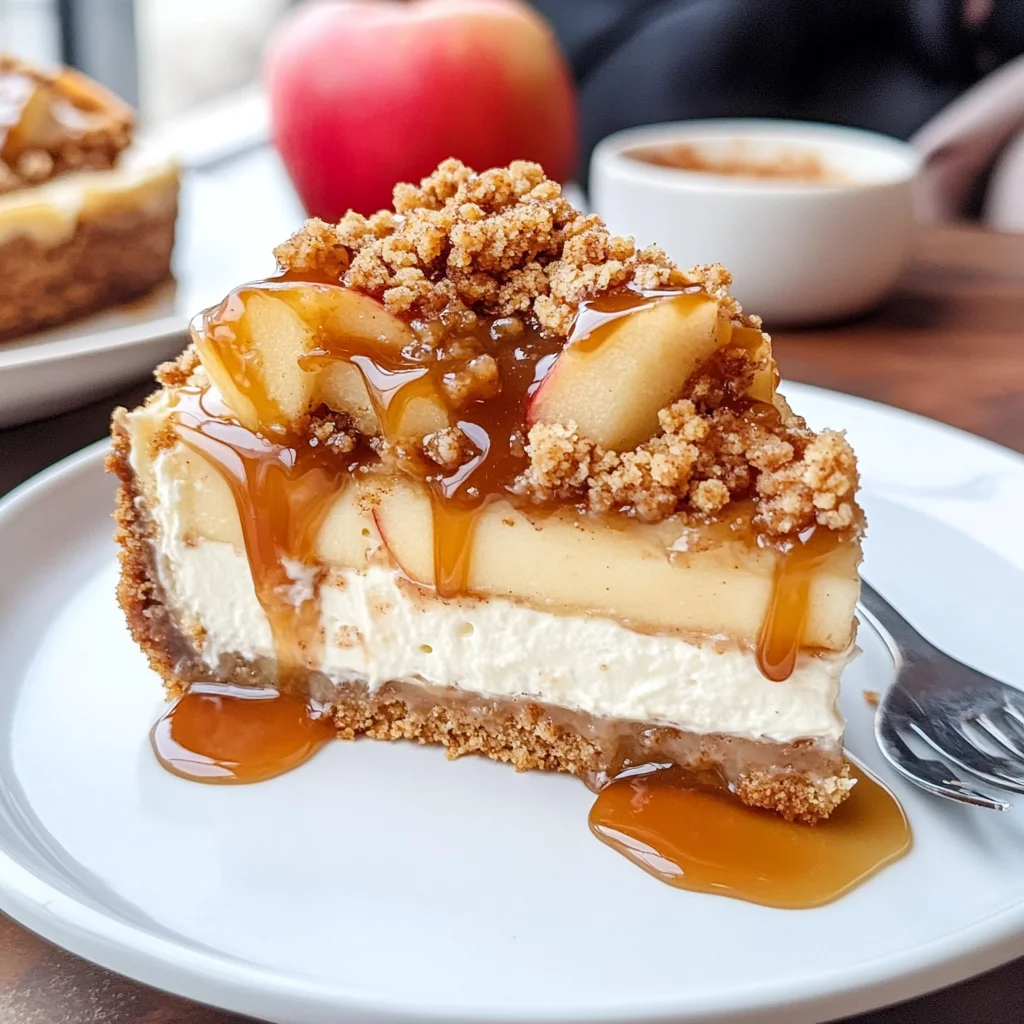
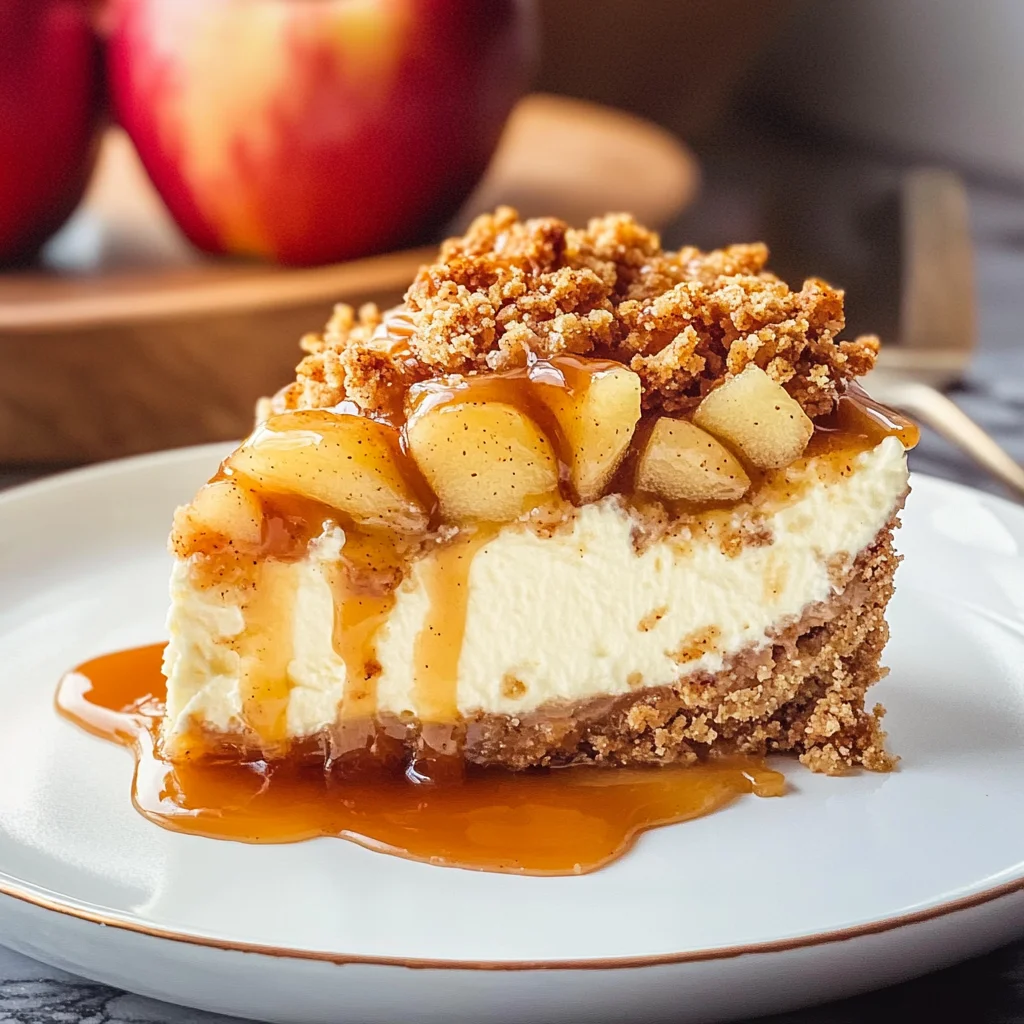
Apple Crisp Cheesecake
If you’re looking for a dessert that wraps you up in warmth and comfort, then let me introduce you to my beloved Apple Crisp Cheesecake. This delightful treat combines the creamy goodness of cheesecake with the nostalgic flavors of apple crisp, making it perfect for any gathering. Whether it’s a family dinner, a cozy night in, or a festive celebration, this dessert will surely impress.
The best part? You don’t need to be a baking pro to recreate it! With simple steps and wholesome ingredients, you can bring a slice of comfort to your table. Grab your apron, and let’s dive into this delicious recipe!
Why You’ll Love This Recipe
- Deliciously Unique: The combination of creamy cheesecake and spiced apples creates an unforgettable flavor experience.
- Family-Friendly: Everyone loves cheesecake and apples! This dessert is sure to become a favorite among both kids and adults.
- Easy Preparation: Simple ingredients and straightforward steps make this dessert achievable for bakers of all skill levels.
- Perfect for Any Occasion: Whether it’s Thanksgiving or just a Tuesday night, this cheesecake fits right in.
- Make-Ahead Convenience: Prepare it ahead of time so you can enjoy quality moments with loved ones instead of being stuck in the kitchen.
Ingredients You’ll Need
You’ll find that the ingredients for this Apple Crisp Cheesecake are both simple and wholesome. Each component plays an important role in creating that dreamy texture and delightful flavor that makes this dessert so special.
For the Crust
- 3 cups graham crumbs
- 3 tablespoons brown sugar
- 1/2 teaspoon cinnamon
- 1/2 cup unsalted butter (112 grams) (melted)
For the Apple Filling
- 2 large apples (I recommend Granny Smith or Gala)
- 2 tablespoons brown sugar
- 1 1/2 teaspoons cinnamon
For the Oatmeal Crumble
- 1/2 cup all-purpose flour (63 grams)
- 1/2 cup brown sugar (100 grams)
- 1 teaspoon cinnamon
- 1/2 cup quick oats
- 1/4 cup unsalted butter (56 grams) (melted)
For the Cheesecake Filling
- 24 ounces full-fat cream cheese (680 grams) (room temperature)
- 3/4 cup granulated sugar (150 grams)
- 1/4 cup brown sugar (50 grams)
- 1/2 teaspoon cinnamon
- 1 tablespoon cornstarch (or 2 tablespoons all-purpose flour)
- 1 teaspoon vanilla extract
- 1/2 cup sour cream (120 ml) (room temperature)
- 3 large eggs (room temperature)
Other Essentials
- boiling water (for the water bath)
- salted caramel sauce
Variations
One of the best things about this Apple Crisp Cheesecake is how flexible it can be! Feel free to get creative with these variations:
- Add Nuts: Toss in some chopped walnuts or pecans for an extra crunch.
- Change Up the Fruit: Try adding pears or even berries for a different flavor twist.
- Swap the Sweetener: Use coconut sugar or maple syrup instead of brown sugar for a unique taste.
- Make It Chocolatey: Drizzle some melted chocolate over the top before serving for a decadent touch.
How to Make Apple Crisp Cheesecake
Step 1: Prepare Your Pan
First things first, we want to make sure our cheesecake bakes perfectly. Preheat your oven to 350F (180C). Wrap the outside of a 9-inch springform pan with tin foil. This helps prevent any water from seeping in during baking. Lightly grease the pan with non-stick cooking spray.
Step 2: Make the Crust
In a mixing bowl, combine graham crumbs, brown sugar, and cinnamon. Pour in melted butter and mix until everything is well combined. Press this mixture firmly into the bottom of your prepared pan. A solid crust will create that perfect base for your creamy filling!
Step 3: Prepare the Apples
Peel, core, and slice your apples thinly. In another bowl, toss them with brown sugar and cinnamon until they are well coated. This step enhances their sweetness and adds an irresistible aroma as they bake.
Step 4: Mix the Oatmeal Crumble
For that delicious topping, combine flour, brown sugar, cinnamon, quick oats, and melted butter in a bowl. Mix until crumbly—this will add texture to your cheesecake!
Step 5: Create the Cheesecake Filling
In a large mixing bowl, beat together room-temperature cream cheese, granulated sugar, brown sugar, cinnamon, cornstarch, vanilla extract, sour cream, and eggs until smooth. Beating it well ensures there are no lumps—smoothness is key!
Step 6: Assemble Your Cheesecake
Pour half of your cheesecake filling over the crust in your springform pan. Then layer on those beautiful spiced apples followed by another layer of filling. Sprinkle the oatmeal crumble on top for that classic apple crisp finish.
Step 7: Bake Your Cheesecake
Place your springform pan inside a larger baking dish filled halfway with boiling water—this water bath keeps everything moist while baking. Bake for about 55 minutes until set but slightly jiggly in the center.
Step 8: Cool & Serve
Once baked, turn off the oven but leave your cheesecake inside with the door slightly ajar for an hour. This cooling method helps prevent cracking. Afterward, refrigerate it for at least four hours before serving. Drizzle with salted caramel sauce just before enjoying!
And there you have it! A comforting slice of Apple Crisp Cheesecake awaits you—a blend of flavors that feels like home! Enjoy every bite!
Pro Tips for Making Apple Crisp Cheesecake
Making this Apple Crisp Cheesecake is a delightful experience, and with a few handy tips, you can ensure it turns out perfect every time!
-
Use room temperature ingredients: Allow your cream cheese, eggs, and sour cream to sit out for about 30 minutes before mixing. This helps create a smoother batter without lumps.
-
Don’t overmix the batter: Gently mix your cheesecake ingredients until just combined. Overmixing can incorporate too much air, leading to cracks during baking.
-
Water bath for even baking: Using boiling water in the oven will help regulate the temperature around the cheesecake, resulting in a creamy texture without cracks.
-
Cool gradually: After baking, turn off the oven and leave the cheesecake inside for an hour with the door slightly ajar. This gradual cooling helps prevent cracking from sudden temperature changes.
-
Make ahead of time: This cheesecake tastes even better after it has chilled overnight in the fridge. Make it a day ahead for an impressive dessert that’s ready to serve!
How to Serve Apple Crisp Cheesecake
When it comes to serving your Apple Crisp Cheesecake, presentation can make all the difference! Here are some ideas to make your dessert shine.
Garnishes
- Drizzle of salted caramel: A generous drizzle of salted caramel not only adds sweetness but also enhances the apple flavor beautifully.
- Whipped cream: A dollop of freshly whipped cream on top adds lightness and balances the richness of the cheesecake.
- Cinnamon dusting: A light sprinkle of cinnamon on top can add an extra touch of warm spice that complements the flavors perfectly.
Side Dishes
- Vanilla ice cream: The creamy texture and cool temperature of vanilla ice cream offer a lovely contrast to the warm spices in your cheesecake.
- Fresh fruit salad: A vibrant mix of seasonal fruits can provide a refreshing balance to the rich flavors of the cheesecake.
- Coffee or tea: Serving with a cup of coffee or herbal tea enhances the dessert experience by providing warmth and comfort alongside each slice.
- Cheese platter: For a more sophisticated touch, pair slices with a selection of mild cheeses that can cut through the sweetness while adding depth to each bite.
With these serving suggestions and pro tips, your Apple Crisp Cheesecake will not only taste divine but also look stunning at any gathering! Enjoy baking and sharing this delightful dessert!
Make Ahead and Storage
This Apple Crisp Cheesecake is not only a delightful dessert but also perfect for meal prep! You can make it ahead of time and store it, allowing the flavors to meld beautifully. Here’s how to keep your cheesecake fresh for later enjoyment.
Storing Leftovers
- After the cheesecake has cooled completely, cover it tightly with plastic wrap or aluminum foil.
- Store in the refrigerator for up to 5 days.
- For best texture, avoid leaving it out at room temperature for extended periods.
Freezing
- To freeze, allow the cheesecake to cool completely, then wrap it well in plastic wrap followed by aluminum foil.
- It can be frozen for up to 3 months.
- Thaw in the refrigerator overnight when you’re ready to enjoy a slice.
Reheating
- If you prefer your cheesecake slightly warm, preheat your oven to 250°F (120°C).
- Place slices on an oven-safe dish and heat for about 10-15 minutes until warmed through.
- Alternatively, you can microwave individual slices on a microwave-safe plate for about 20-30 seconds.
FAQs
Here are some common questions about making this delicious Apple Crisp Cheesecake:
Can I use different types of apples for the Apple Crisp Cheesecake?
Absolutely! While Granny Smith and Gala apples are great choices due to their balance of tartness and sweetness, feel free to experiment with other varieties like Honeycrisp or Fuji for a unique flavor profile.
How should I serve Apple Crisp Cheesecake?
Serving Apple Crisp Cheesecake is easy! It’s delightful as is, but you can elevate it further by drizzling some salted caramel sauce over each slice before serving. Add a dollop of whipped cream or a scoop of vanilla ice cream for extra indulgence!
What makes this Apple Crisp Cheesecake so creamy?
The secret to its creaminess lies in using full-fat cream cheese at room temperature along with sour cream. These ingredients blend perfectly during mixing, resulting in that rich and velvety texture we all love.
Can I make this Apple Crisp Cheesecake gluten-free?
Yes! Simply swap out regular graham cracker crumbs with gluten-free graham crackers or even almond flour. Make sure your oats are certified gluten-free as well if you’re using them in the crumble topping.
Final Thoughts
I hope this recipe brings warmth to your kitchen and joy to your table! The combination of creamy cheesecake with cinnamon-spiced apples and crunchy crumble makes this Apple Crisp Cheesecake truly special. I can’t wait for you to try making it and share it with family and friends. Enjoy every bite!
Apple Crisp Cheesecake

Indulge in the warmth and comfort of Apple Crisp Cheesecake, a delightful fusion of creamy cheesecake and spiced apples that’s perfect for any occasion. This dessert beautifully marries the rich texture of cheesecake with a crispy oat topping, creating a heavenly experience in every bite. Whether you’re celebrating a special gathering or enjoying a cozy night at home, this Apple Crisp Cheesecake will impress friends and family alike. With straightforward steps and easily accessible ingredients, even novice bakers can achieve this delicious treat. Grab your apron and prepare to create an unforgettable dessert that feels like home!
- Prep Time: 30 minutes
- Cook Time: 55 minutes
- Total Time: 1 hour 25 minutes
- Yield: Serves approximately 12 slices 1x
- Category: Dessert
- Method: Baking
- Cuisine: American
Ingredients
- 3 cups graham crumbs
- 3 tablespoons brown sugar
- 1/2 cup unsalted butter (melted)
- 2 large apples (Granny Smith or Gala)
- 24 ounces full-fat cream cheese (room temperature)
- 3 large eggs (room temperature)
- 1/2 cup sour cream (room temperature)
- 1 1/2 teaspoons cinnamon
- 1 tablespoon cornstarch
- 1/2 cup all-purpose flour
- 1/2 cup brown sugar (for crumble)
- 1 teaspoon cinnamon (for crumble)
- 1/2 cup quick oats
- 1/4 cup unsalted butter (melted, for crumble)
- boiling water (for the water bath)
- salted caramel sauce
Instructions
- Preheat your oven to 350°F (180°C). Prepare a 9-inch springform pan by wrapping it in tin foil and lightly greasing it.
- For the crust, combine graham crumbs, brown sugar, and melted butter in a bowl. Press firmly into the bottom of the prepared pan.
- Slice apples thinly and toss with brown sugar and cinnamon in a separate bowl.
- Mix together flour, brown sugar, cinnamon, quick oats, and melted butter for the crumble topping until crumbly.
- In a large bowl, beat cream cheese, sugars, cinnamon, cornstarch, vanilla extract, sour cream, and eggs until smooth.
- Layer half of the cheesecake filling over the crust followed by spiced apples and then the remaining filling topped with oatmeal crumble.
- Place the springform pan in a larger baking dish filled halfway with boiling water. Bake for about 55 minutes until set but slightly jiggly in the center.
- Turn off the oven and let the cheesecake cool inside for an hour before refrigerating for at least four hours.
Nutrition
- Serving Size: 1 slice
- Calories: 360
- Sugar: 25g
- Sodium: 260mg
- Fat: 22g
- Saturated Fat: 13g
- Unsaturated Fat: 8g
- Trans Fat: 0g
- Carbohydrates: 33g
- Fiber: 2g
- Protein: 6g
- Cholesterol: 80mg